XR650L Round LED Headlight, Cowl, and Windscreen Assembly Installation Instructions
- rcl5011
- Dec 8, 2025
- 3 min read
Updated: Dec 27, 2025

Table of Contents
Overview
These installation instructions will walk you through the installation of our round 7in LED headlight assembly.
Tools Required
10mm wrench/socket with ratchet
12mm wrench/socket with ratchet
5mm hex wrench (Allen Wrench)
Torque wrench
Chemicals
WD-40 or Similar
Blue Loctite
Components Required
Headlight Installation
Using a 10mm wrench/socket, remove the bolts from both sides that hold the front headlight cowl on.

With both cowl bolts removed, pull upward and forward on the shroud to remove it.

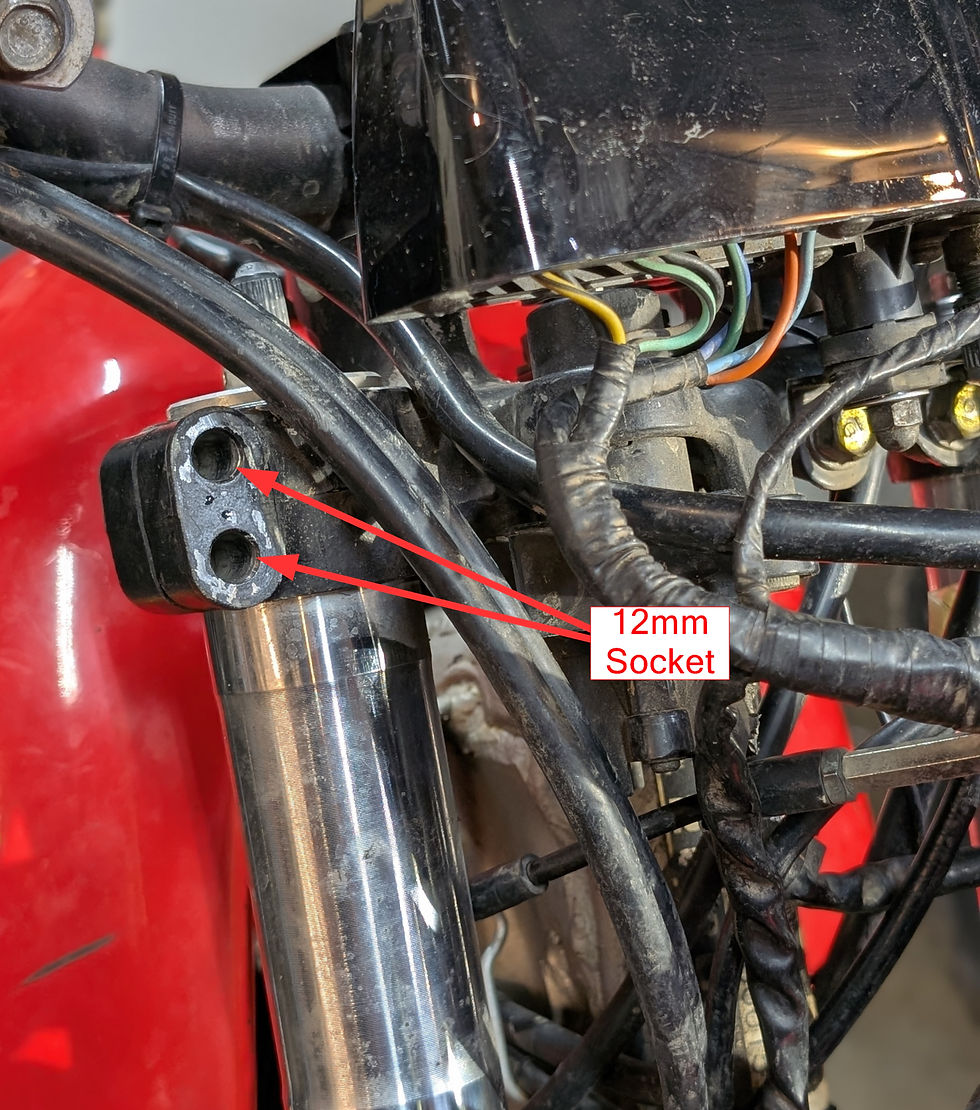
Using a 12mm socket, remove the two bolts (one per side) holding the headlight assembly onto the frame (support the headlight when removing the last bolt).

With the headlight removed, disconnect the electrical connection by wiggling it slightly as you pull upward and it will pull away from the headlight lamp.

Disconnect all electrical connections inside of the rubber wire harness boot.

Disconnect the three electrical connections shown below, and remove the connectors from the metal bracket.


Remove the OEM headlight bracket by taking off the two nuts and washers shown below.

Lift up the speedometer assembly and remove the speedometer cable.

Remove and discard the OEM headlight bracket

Reinstall the speedometer cable and previously removed washers and nuts with a 10mm socket

Remove the nut that holds the horn in place using a 12mm socket

Apply blue Loctite to the threads, and install the supplied aluminum hex standoff using a 12mm socket.

Remove the headlight assembly from the cowl assembly using a 5mm hex wrench.

Remove the turn signals from both sides of the upper tripple clamps using a 12mm socket
Reconnect the thee primary electrical connections below as shown

Reconnect all of the connections within the rubber boot except for the turn signals

Install the headlight cowl assembly onto the bike by using a 12mm socket. Install the turn signal brackets after the col, then install the upper triple clamp bolts as shown. Torque bolts to 28N-m (20Ft-Lbs)


Pass the turn signal wires through the rubber grommets on the side of the cowl. Apply WD-40 (0r similar) to the surface of the turn signal wires prior to pulling them through the grommet if they are tight fitting.


Reconnect the turn signal wire connections inside of the rubber boot. (1 blue, 1 orange, 2 green)

Using the three rectangular holes in the cowl bracket, secure all wire connections using zip ties as shown.


Install the supplied button head bolt and washer at the bottom of the cowl suing a 5mm hex wrench as shown.

Connect the last remaining electrical connection by connecting the headlight to the wiring harness, and install the headlight by using the supplied button head bolts and washers (APPLY LOCTITE). Adjust the headlight angle to desired position prior to tightening the bolts.
*Note: The single red wire connector is an accessory parking light that can be optionally powered with a secondary switch if you so choose, should otherwise be left disconnected.

Headlight assembly is now complete.

Installation of Windscreen
Remove the four button head screws on the top of the cowl using a 2.5mm hex wrench.

Reinstall the button head screws through the windshield brackets as shown (note orientation is CRITICAL). Then install the four supplied rubber nuts.

Install the windshield with the four plastic washers and four button head screws.

Assembly is now complete


Comments