XR650L Tachometer Installation
- rcl5011
- Sep 7, 2023
- 1 min read
Updated: Dec 15, 2023

Table of Contents
Overview
Tools Required
Components and Chemicals Required
Installation
Overview
Want to add a tachometer to your XR650L? This guide will show you how to do the installation.
Tools Required
10mm, 12mm, 30mm Sockets
2.5mm Hex Wrench
Wire Cutters
Components and Chemicals Required
Loctite
Spectrum Moto Tachometer Mounting Bracket
Installation
Start by removing your handlebars using a 10mm or 12mm socket.

Remove the top triple clamp nut and washer using a 30mm socket.

Install the Spectrum Moto tachometer mounting bracket under the washer and nut as shown. Ensure that it is as square as possible prior to tightening the nut back down. Use a straight edge to align as desired.

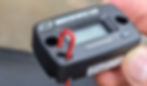
Follow the instructions for the tachometer wire installation in the included booklet. Pull the supplied wire through the tachometer and push it into the blind hole, then pull tight to lock it in place. (We are using a red wire here to illustrate assembly just to show clarity, your wire is black)

Next, install the two mounting screws through the tachometer and into the bracket using blue locktite.

Route your wire down through your cable passageways to your spark plug cable. TIGHTLY wrap your spark plug cable with at least three turns of wire prior to wrapping it back onto itself and zip tying it in place as shown.

Fire up your bike and enjoy knowing what RPM your bike is running at, and also now having the ability to log hours of operation for service intervals!
